Insurance Comparison (Omnium)
This module allows you to compare and review insurance products and generate an SOA.
Fully integrated into AdviceOS, Insurance Comparison uses the data from your client fact find and lets you select your desired cover and scoring to run a tailored insurance analysis for your client.
Using the robust Omnium API, insurance comparison will search more than 90 insurance providers to find options that match your cover criteria.
The visual insurance comparisons interface provides an easy way to run a like-for-like comparison across key criteria and provides a visual score for each policy against the stated client requirements. If you need more details on a policy, the full PDS, a detailed feature analysis and policy definitions; these are all available through Omnium.
After you have selected the preferred insurance product, you can validate that the quote is correct (although some providers do not make premium validation and application integration available). If the client decides to go ahead with your advice, the Omnium module integrates directly with the insurance providers quote generation system so you can easily complete the purchase and avoid double entry.
Insurance Comparison integrates with the Insurance Needs Analysis module so you can pull through any recommended and alternative products and easily generate your SOA.
The AdviceOS Insurance Comparison (Omnium) is an integration between Omnilife and AdviceOS. This means the
Insurance Comparison (Omnium) uses the Omnium insurance research as well as several features which advisers can
use to search, select and compare policies for their client. Some new features include:
- Premium validation
- Quote transfer
- Save to Fact Find
- Multi-select
- Preset cover setting
- New charts (e.g. premium basis, cumulative charts)
Adding Insurance Information Into the Fact Find and Features inside Omnium.
You do have the option of adding in Insurance details for your client within the fact find. See fact find guide on how to do this in our Help Centre.
However by adding in your insurance policy here you are not obtaining the fees and features information for the product, which you need for a Comparison and for information to flow through to your SOA.
To add your inforce (existing policy) and include the fees and features of that policy you first must go to Omnium to add these in.
To access the Insurance Comparison (Omnium) module go to the Main Menu (1) > Modelling (2) > Insurance Comparison (Omnium):
In the Product Settings tab you will then need to '+Add' (1) your cover details as well as tell the system what your clients Occupation is (2):
To add standalone options simply add by choosing the relevant cover type from the dropdown above.
To add extensions to Life Cover, you will need to add your life cover first before selecting '+Add' again and choosing 'Rider/Extensions' from the dropdown. 
When adding your covers you will notice that you have a feature there called 'Multi-select':
Multi select allows you to search across multiple criteria. To arrange toggle to turn on multi-select and then you will notice that each feature will allow you to select more then one option:
This functionality allows you to bring through more policies because it allows you to cover more features- in turn ensuring that you can select the policy that best suits your client.
You also have the ability to preset cover selections which will save the cover settings you input so that they will always appear for all your clients when you access omnium. To do this select the three vertical dots and choose 'Manage Preset Cover Settings':
Then you will name the preset cover settings (1):
To load it for other clients you will click on 'Manage Cover Settings' again and this time load the cover settings that is appropriate for your client (2).
Once you have added your cover details, you will select 'Search Products' to bring through the list of Policy Providers that match the level of cover you have set along with the fees and features built into them:
The policies that appear are based on what is selected within Supplier Management. This tool can be found on the top right:
If you want to remove or add policies that you would like within your comparison, simply select the relevant supplier from the dropdown (1) and then untick or tick the policy providers you would like included for your comparison:
You also have the option to add loadings via the 'loadings manager':
This will allow you to apply a loading across one provider or all providers
The scoring weights tab:
This allows you to change how the combined score (combination of the premium and the feature) is calculated. In other words it allows you to prioritize premiums over features or visa versa. 
Furthermore, we can update our scorings weights again in the settings wheel tab:
You can also change the frequency of the premiums in the settings bar (1) or tell the system to not show excluded products (2).
Once you have selected Search Products you will select the Policy that the client has (1) and then the 3 vertical dots (2) to the right and choose 'Save to Fact Find' (3):
This will subsequently save your inforce (existing) policy to the Fact Find as well as in the Needs Analysis. The policy will include premiums, scorings and features (unlike if you had simply just added in the insurance details in the fact find).
Needs Analysis
Now that you have added your existing (inforce) policy through Insurance Comparison (Omnium), you can now make your recommendation.
To make a recommendation using Omnium users need to start in the Needs Analysis Module. This will ensure that the recommendation and insurance comparison information will populate in the
SOA.
To access the needs analysis Go to the Main Menu (1) > Modelling (2) > Needs Analysis (3):
The Needs Analysis module includes calculators to determine the cover needs for the client (1). For more information on how to use these calculators please access our Needs Analysis guide in the Help Centre. If you do not need to use the calculators to determine insurance needs you simply need to skip ahead to the 'Product Recommendations' tab (2):
Once you have accessed the Product Recommendations tab, you can view your inforce policies (policies that have been saved from our fact find) by select from the drop down either 'Status-All' or 'Status Inforce' (1). To add a recommendation you will need to select '+Add' (2) and select the client and insurance type from the dropdown menu:
If you have used the needs analysis calculators, the cover amounts will automatically populate next to the cover types you used calculators for. For example if you used the Income Protection calculator and this was the end result (see below) the Income Protection cover you add as your recommendation will automatically populate with $18,750 as per the outcome below. You can of course edit this amount to match what you believe may be a more appropriate amount for your recommendation.
Alternatively, if your client has an existing (inforce) policy in place you also have the option to Clone the product and make slight adjustments. This will clone the existing policy and convert the status to recommended and you can adjust the cover information to reflect the recommendation. To do this select the inforce policy (1), then select 'Clone Product' (2):
Once you have added your recommendation and selected recommended in Needs Analysis, click on 'Compare Product' to be redirected to the Insurance Comparison (Omnium) module:
Products
Product Settings
Once you have added your recommendation through needs analysis and selected Compare Product, you will be redirected to Insurance Comparison (Omnium) > Product Settings. Your recommended cover options will flow through from needs analysis and appear on the right:
You can update each field using the dropdowns if you wish to select more appropriate options. The fields under each cover type allow you to capture cover amount, tax environment, premium basis, premium waver
and pay by rollover. These criteria will be used to filter the search results.
The product settings section at the top of this page automatically populates with the clients personal details. You will however need to again input your clients occupation in the 'Search Occupation' field:
Once you have set your occupation and the required cover amounts and types, select Search products before choosing the policy you would like to recommend your client take out:
At times you may notice that excluded products will flow through with error messages looking like this:
To workout why the policy is excluded, either hover over over the red 'i' sign or select error messages in the 3 dots drop down:
Hovering over the information icon will give you a very broad understanding of why your policy is excluded:
To view a more detailed layout of why your policy is excluded you should select error messages (by clicking 3 vertical dots). If you believe that it shouldn't be excluded, it will prompt you to change something in order for it to be included.
For example your error messages may be this:
In this case within your covers you will need to change the following:
You can access the PDS through Omnium be selecting on the 3 vertical dots:
To access TMD material, again select the 3 vertical dots tab and choose TMD. This will allow licensees, practices and users with the ability to collate and maintain TMD factsheets for every product
they recommend (where available), and to manually extract any relevant information from the PDF documents to help
determine whether a recommendation meets the TMD or not.
If MLC is my recommendation, the TMD will look something like this:
You can also view the IP matrix from the dropdown:
It will look something like this;
Some providers will have premium validation available which allows you to verify the premium provided in
the Insurance Comparison (Omnium) with the provider directly – refer to ‘Verify’ column. Alternatively,
selecting the transfer icon will transfer the client settings to the provider’s own calculator to generate a quote.
Depending on the provider they may require the user to log in.
You can validate the quote by selecting this portion of the icon: 
Or you can transfer by selecting this portion of the icon: 
By validating a quote- the premium that omnium calculates is sent to the provider who will subsequently confirm whether or not the premium is an accurate quote.
Transferring the quote- means omnium will take all of the search criteria for your covers and take it to the providers website (quote generator). Each provider has different quote generators and some may ask for a login; for example:
Premium Projections
Before moving onto the next tabs in the Insurance Comparison (Omnium), ensure that you have selected the covers you wish to include in your comparison- 
The premium projection page will outline the premiums for the selected policy providers; it will look something like this:
It will also provide details on which policy provider is the cheapest along with Feature and policy scores. The policy highlighted green is the cheapest and the policies in orange are more expensive.
To obtain specific premium information for each cover type select the expand button:
The actions button (3 vertical dots) provides a drop down where a user can delete the policy, view details, download
the PDS, view TMD, save to Fact Find or edit the premiums that may not be accurate.
If you select ‘Edit’ to edit premiums, the following dialogue box appears. The ‘Edit values’ checkbox (1)
allows you to manually edit premium projections. The ‘Apply discount (%)’ (2) option applies a percentage
discount to each year:
In the drop down you can select which fees you wish to edit:
Comparison
Charts
‘Charts’ tab includes premium and feature score graphs. AdviceOS has a number of charts available for cumulative premium, premium basis and cumulative premium basis. To view these, use the ‘Map age to’ drop down in the top right hand corner.
The charts tab allows you to compare policy and feature scores as well as provide details for the first year policy score verses premiums in 3 easy to read graphs.
Features
The ‘Features’ tab is where a user can select and compare the features between each policy for reports and the SOA using the checkboxes (1); a user can also select “show differences only” (2) as well as having the ability to select the cover type (3).
Definitions
The ‘Definitions’ tab includes a detailed explanation of the features of each insurance. Use the checkboxes to include these definitions in the insurance reports and SOA (1). A user can also filter by features selected in the previous page (2) and view the details by the cover type (3).
Recommendation
Product Recommendation
The ‘Product recommendation’ tab is where a user can select the existing insurance, the recommended and an alternative. This will show the features gained and lost as well as the difference between the cost.
When opening this tab, your page will look like this:
Your first step is to select your existing product. If you have correctly added the product to needs analysis module (using the process discussed in the Adding insurance information into the fact find and features in Omnium section above) your existing policy will appear next to [Inforce]: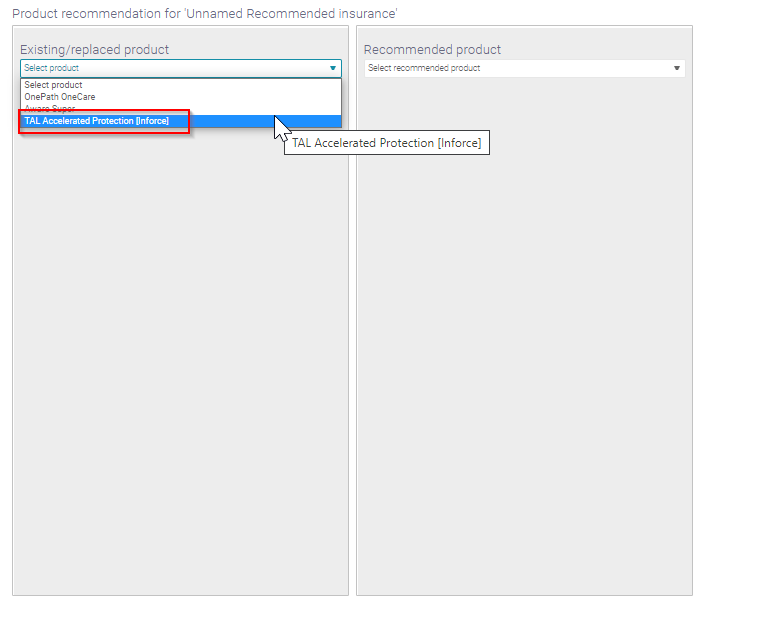
Then select your recommended policy provider:
To add an alternative for comparison purposes (first ensure it is selected in Product settings tab) then click 'add alternative comparison':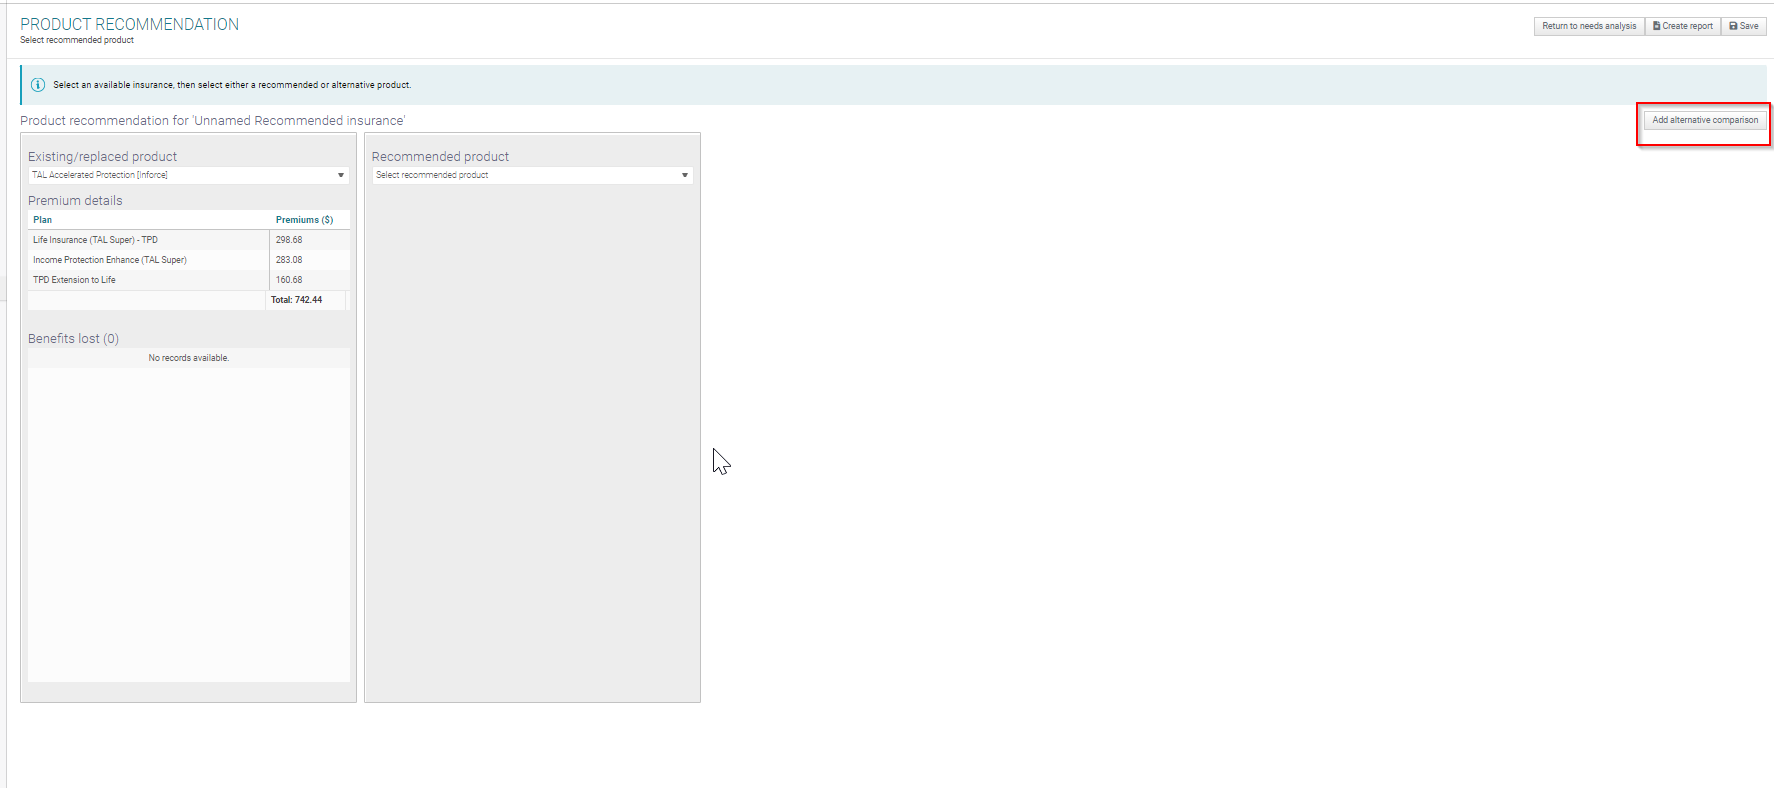
Your page will look something like this now:
To generate a report that include information generated from Omnium (definitions, premiums, features and policy comparisons), use the ‘Create report’ option in the top right corner of your computer. After clicking this option you will see the following tick box:
Click yes and the report will appear under your recent reports which can be accessed by clicking on your name:
You also can produce an SOA through Plan Builder to bring all insurance information through to an advice document. Please review our Plan Builder guide for how to information.
For any further enquiries on this module:
Contact: 1300 882 938
Email: info@midwinter.com.au
Related Articles
Insurance Comparison (Omnium) - Webinar
Product Comparison
Introduction Midwinter has been providing product comparison tools since the release of our Reasonable Basis comparison tool in 2007. Overview Product Comparison can be used in conjunction with our Total Portfolio Analysis (TPA) feature for product ...Target Market Determination
Introduction The Treasury Laws Amendment (Design and Distribution Obligations and Product Intervention Powers) Act 2019(Cth) came into effect on 5 October 2021 (DDO Laws). The new Design and Distribution Obligations (DDO) require issuers to design ...Needs Analysis
Needs Analysis allows users to utilize available fields to determine the appropriate levels of cover for the client, and provide insurance advice through AdviceOS. 1. Accessing the Needs Analysis module The module can be accessed via Home - Modelling ...Online Training Video - Introduction to Omnium