Retirement Module
The Retirement Module is an easy to use, comprehensive retirement modelling tool for singles or couples.
It allows you to map your clients financial position in retirement. This tool is best utilized for clients who may be retiring; now or within the next 10 years. The Retirement Module will show your client whether or not they can afford to retire based on certain circumstances that you input.
Features include:
- Model how long your client’s funds will last in retirement
- View cashflow and capital projections
- Compare existing and recommended retirement scenarios
- Outputs include access to comparison graphs for both income and capital comparisons
Accessing the Retirement Module
`The retirement module (for those that have this module turned on for them) can be accessed via the main menu (1) > modelling (2) and selecting Retirement (3):
Once you have accessed the Retirement Module, you will note the Menu on the left-hand side which comprises of 4 sections:
- Inputs- In this section you will input your clients information into the settings, existing and recommended tabs.
- Outputs- Will allow you to analyze the results of your inputs and compare between your existing scenario and recommended scenario from a cashflow and capital perspective.
- Summary- Will summarize and demonstrate the value of advice to your client.
- Advice- Allows you to create a retirement report directly from the module.
Fact Find
Before commencing strategy within Retirement Module, ensure that you have completed the relevant information in the Client > Fact Find module*.
The relevant information:
- Personal Details (1) - Retirement Age (2 and 3)
- Personal Details (1)- Complete Risk Profile (2 and 3) and Salary (4 and 5)
- Add a Superannuation account in Super, Pension and Investments Tab
- Add a Residential Property within Personal Assets and Liabilities (if they own residential property)
*For more information on how to find/complete your Fact Find for your client- see the Fact Find guide we have in our help centre.
INPUTS
Settings
The settings tab brings through all the details you have input from the fact find.
If it has not, then please select 'Update From Fact Find':
To modify the salary's indexation rate or to modify the salary rate for future financial years select 3 vertical dots next to the salary: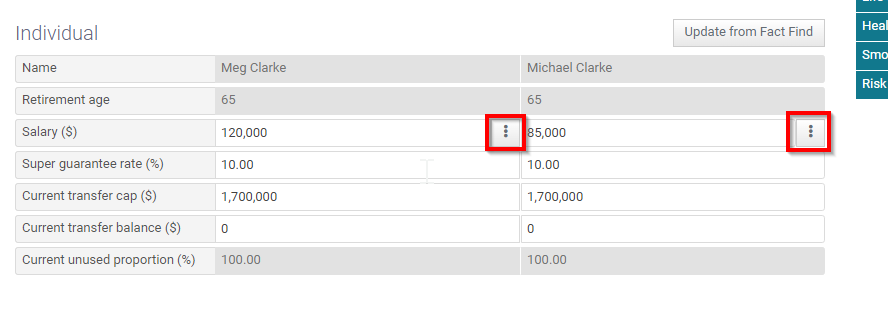

The salary will stop in the year that the client retires.
General Settings-
The start projection date defaults to the month you are currently in (1), but you do have the option to start projections at retirement (tick box) (2).
The end of projection drop down box (3) defaults to the life expectancy of your client + 5 years. For instances where there is a Couple involved- it is based on the youngest of the 2 clients life expectancy (plus 5 years). You can change the end of projection date by selecting the most relevant option in the drop down box.
The show present value (4) once ticked will convert all number values in the retirement module to discounted present value rate based on inflation. If you would like it to be based on future rates and todays dollars- leave this box unticked.
The use risk profiles (5) allows you to use the return rates that is based on the stored risk profiles within your Settings (see Settings > Risk Profiles for more information on how these are set- at either Midwinter or Dealer Group Level). If this is unticked you will be able to specify the income and growth rate for both accumulation and pension phase in the Existing Scenario and Recommended Scenario tabs.
Centrelink-
The software will determine their homeowner status depending on their assets. If you have added in residential property within the fact find section this will default to HomeOwner. You can change this status by choosing a more suitable option within the dropdown. 
'No centrelink included' option allows you to leave out the age pension from being considered within your projections.
To add in further personal assets such as a Car and Contents simply complete the Personal assets field with the total amount of these assets. Again you can set indexation and specific values within specific years by selecting the 3 vertical dots. 
Investments-
You can also add in any other financial investments that your client/s possesses outside super and pension. 
Existing Scenario
The existing scenario looks at whether or not the client can afford to retire at his desired retirement age based on his current situation.
For example, say your client wants to retire with an income of $60,000 per annum. The existing scenario will allow you to work out if this is possible based on your clients current situation.
When first entering the existing scenario, you will notice that the income required will be $41,929.
This is the default ASFA Modest amount- it is based on a minimum annual cost to support a couple in retirement.
Selecting the 3 vertical dots will produce the following 3 options:
You do have the option of not choosing ASFA Modest or ASFA Comfortable and instead putting in a value based on your clients objectives. To input manually a specific amount simply select Annual Income Required from the drop down and input your amount as well as relevant indexation.
Existing Scenario Graph:
This graph shows us 3 things:
- Capital amount (in red)
- Desired income (in yellow)- this is set by the income required field you set (see above). This yellow line will be flat if you have selected present values in the settings tab. If it is increasing upwardly or downwardly, it is showing future values.
- Income (blue line)- is the actual income that the client is receiving- it shows you whether the client meet his retirement goal
If your graph looks like this:
- Your client here is receiving a salary income which is above their desired income
- Here your client has retired and rolled to pension and their pension payments meet desired income
- At this point, your clients Retirement Pension has run out and they no longer meet their desired income. Their income is being funded by the Age Pension (which is below their desired income)
Existing Scenario Analytics
Under the graph on the right is an existing scenario summary table which summarizes what you are seeing in the graph above. It looks something like this:
Accumulation Section of the Existing Scenario Tab:
The Super Balance (1) flows through from the fact find if you have selected update from fact find in the settings tab.
If your client has a contribution plan in place you can add this information into the Concessional and Non-Concessional fields (2).
The risk profile (3) field is based on you selecting 'Use Risk Profile' in the Settings tab. If you had unticked this field this field would look like this (see below) and you will be able to input the Income/Growth rates yourself for each client.
You can also enter a fee rate (4) for super- this is an assumption of the total fees they are paying within their accumulation account.
Retirement Section of the Existing Scenario:
You have the option to change the month and year of your clients retirement date (1) and their rollover date (2).
The initial balance field (3) allows you to put a balance in if your client has already retired. If your client is still in accumulation phase, then you will leave this field as 0. The software will automatically convert your client into an Account Based Pension when your client reaches the rollover date you have set above (2).
The other income (4) field allows you to add in other types of income streams such as an annuity or defined benefit scheme. Selecting the 3 vertical dots on the right will load this:
Specifying a defined benefit will mean you will need to click the 'Is this a defined benefit' tick box (1). Leaving this box unticked lets the system know that your client has an annuity.
Again, you have the option of choosing risk profile and fee rate for your pension (5).
Payment is deemed (6) allows you to select whether or not your pension account is deemed for Centrelink purposes.
Payment is existing field (7) is only relevant when your client is already in retirement and you have a projection start date that is halfway through the financial year.
Age Pension overrides field (8) allows you to override the age pension amounts for any particular financial year if any of the figures in your cashflow are incorrect.
Pension Income Drawdown
Cover expenses- Having this field ticked means you want the clients pension payments to match the clients required income amount. If the amount you set in income required above is below the minimum amount then the system will override and put the minimum. Unticking this means you are telling the system to ignore the income required and that you want to set your own amount.
From the drop down you can also select 'Exhaust pension at age' which is you telling the system to ignore the income required and draw down an amount until their pension runs out- you can also set an indexation amount (mine is set to 2.40%):
Before you move onto the Recommended Scenario make sure that you select 'Copy to Recommended' to ensure that your recommendations in the next tab (Recommended Scenario) are based on your clients existing situation (and you don't have to re-enter information- you only have to input your recommendations). 
Recommended Scenario
Allows you to make changes to your clients current situation (Existing Scenario) to see how this affects their retirement goal.
If you have selected 'Copy to Recommended' in the existing scenario, you will note that your Recommended Scenario page will look the same as your existing scenario page before you input your recommendations.
Recommendation Example 1) Your client would like to retire at a later date (later then date set in existing scenario). Naturally, this change will mean that your client will be able to accumulate more money within their super before rolling over at a later date.
To do this, you will simply update retirement date in the below field.
Depending on how far into the future you put this new date, you will see a difference in the way your graph looks from an income and capital perspective after making this change as well as to the age that your ABP will run out.
Recommendation Example 2: That your client commence Salary Sacrifice of $5000 per year, (concessional cap considered) and a Once-off Non-Concessional Contribution of $40,000 (non-concessional cap considered) to help boost their retirement savings.
To arrange Salary Sacrifice select 3 vertical dots in the Concessional ($ p.a.) field (1- Snapshot 1) and then complete the Value field, Indexation and period timeline (1- Snapshot 2)
To arrange your once off NCC of $40,000 select 3 vertical dots in the Non-concessional ($ p.a.) field (2-Snapshot 1), select show months (1- Snapshot 3) and in the month you wish to make your contribution input the value 40000 (Snapshot 4) before pressing ok.
Recommendation Example 3: After changing your clients retirement date and making these contributions to enhance your clients retirement savings, your client may decide that he can afford to spend more in retirement. Therefore, your recommendation is to increase the income desired. To input this recommendation simply click on the 3 vertical dots in the Income Required field and select Annual income required to input your new value:
To discuss process of inputting other recommendations or Retirement Module functionality, please contact 1300 882 938 for more guidance.
OUTPUTS
Existing Cashflow and Existing Capital
This will show detailed reflection of your clients cashflow and capital if they were to continue down their current path and not implement your recommendations. Obviously, these tabs are based on your existing scenario in your input section.
Existing Cashflow Tab
The highlight section shows that my clients will be in accumulation phase and be receiving a salary up until 2045/2047 (1). At this point they will roll to pension.
The system will also calculate Tax and and surplus/deficit the client may have (2). The bottom line shows their desired net income.
From 2045 onwards client commences Account Based Pension as well as their age pension (4). By scrolling across you will be able to see when your clients account based pension runs out.
The graph at the top provides more information around what the income is made up of. The thick black line that runs through your graph is the income required that you set for your client in the existing scenario. The dotted line is the actual income that your client is receiving. My graph shows that this client will be able to meet his desired income for all years in this projection.
Existing Capital Tab
This table and graph details the super balance and pension balance of your client. If you have also added in any investments in the existing scenario tab, it will also show up here as part of the capital as well (I did not in my strategy). The results will show when your pension starts and ends based on your retirement and rollover date and the income you have set in your existing scenario tab. This table and graph will appear in your SOA.
Recommended Cashflow and Recommended Capital
The outputs in recommended cashflow and recommended capital display the same type of information as the existing cashflow and existing capital outputs but instead are based on the recommended scenario inputs. This table and graph will appear in your SOA.
Outcome Analysis
Will provide a snapshot of before (existing) and after (recommended) projection to show how the recommended scenario puts your client in a better position. In retirement. It looks something like this:  Put simply this page is a clear comparison between the two scenarios.
In the top right corner we have a create report tab which allows you to generate a retirement report. By selecting it you can choose the years you would like to be displayed for projection purposes: .
.
You can generate this document as a word document or PDF. This report will pull through all the information from the retirement module.
Quick SOA
To create a quick SOA. Simply click on Create quick SOA in the top right hand corner.
Give your SOA a name and choose the relevant template.
After selecting save you will then need to complete the 3 tabs to flesh out the information for your SOA- Objectives, Recommendations and Advice Fees
When adding a recommendation the subtopic to focus on is 'Retirement Planning':
You will notice that a list of possible recommendations will come up for you to choose from- relevant to your client. Next to each recommendation is text written in brackets. This relates to the section of AdviceOS that you would like the system to pull information from. If you have used only Retirement Module for your modelling you will only select the text next to retirement options- for example:
To ensure you pull through retirement module information you will need to select options that are next to "(Retirement)".
To generate the SOA after you have built in your objectives, recommendations and advice fees you will need to select Generate SOA on the top right: 
The number 1 will appear above your name in the top right like so:
Click on this to access your SOA in the list of recent reports (ensure you press refresh for the SOA to appear)
Please note that all tables and graphs that are appear in the Retirement module will appear in the Appendix section.
For any further questions on this module please contact support:
By Phone: 1300 882 938
By Email: info@midwinter.com.au
Related Articles
Transitions Module
The transitions module is a complete transition to retirement optimization tool. It determine the optimal level of pension income and additional superannuation contribution levels required to provide your clients with the maximum increase in total ...Contribution Optimiser
1. Introduction The Contribution Optimiser Module enables users to determine the best mix of concessional and non-concessional contributions to provide users with the highest possible net contribution to superannuation. Contribution Optimiser has ...Manage Rollovers
1. Introduction This section of Cashflow & Capital allows you to manage all rollovers in and out of your clients superannuation accounts. You can locate the manage rollovers section by navigating to Modelling > Cashflow and Capital > Manage ...Enhancements to Midwinter default SoA template
With the upcoming release on June 30th 2022 we have made several enhancements to the default Midwinter Statement of Advice template and included a number of new recommendations to help improve your experience when creating advice documents within ...Settings
Introduction The Settings Menu is where you should begin with Cashflow & Capital. It contains the basic information on your client and allows you to make changes to the settings used, determine significant dates for the scenarios that you wish to ...